Services Portal 3.1 Release Notes
These release notes describe the new features and enhancements for Services Portal applications (QTRACS, Performance Monitoring, Trailer Tracks, Fleet Mapping, GeoServices, and Administration) in Services Portal 3.1, released in the U.S. summer 2017.
For previous release notes, click here.
Services Portal to Hours of Service Entity Maintenance Bridge
Previously anytime you wanted to create a new driver record or change a driver or vehicle record, you had to do this in both QTRACS and HOS. With Services Portal 3.1 the new Entity Maintenance Bridge (EMB) will attempt to automatically push any vehicle or driver record changes made in QTRACS to HOS if you are licensed for HOS through SSO. At this time, this function only works one way, meaning changes made in HOS will not be pushed to QTRACS; therefore you are encouraged to perform driver and vehicle maintenance in QTRACS when possible.
The EMB supports create, update, and rename (change ID) functions but does not support delete since driver records cannot be deleted in HOS. The EMB will attempt to push changes to HOS for any new or updated information added via the QTRACS portal or web services.
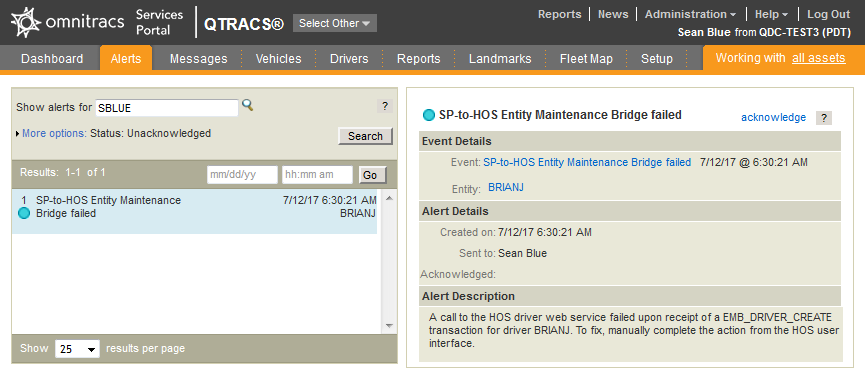
If the EMB fails to push the information to HOS your additions or changes will still be saved in QTRACS but you will need to manually make the additions or changes in HOS. Failure messages will be returned as Services Portal alerts, which are shown in the Services Portal notifier and on the Alerts page. When using the EMB you are encouraged to monitor your Services Portal notifier. No alert will be returned through web services, only through the Alerts page in the Services Portal UI.

To use the EMB, you must first enable the feature through QTRACS company settings. A new Entity Maintenance Bridge section has been added to the bottom of the QTRACS company settings allowing you to turn this feature on or off as you desire. This feature will be turned off by default for existing companies licensed for HOS but will be turned on by default for any companies that add a HOS license after the Services Portal 3.1 release. If you use a TMS or other integration that already performs the same function as the EMB, you should leave the EMB disabled for your company. Check or uncheck the box to enable or disable the EMB then click save.

If licensed for HOS, when adding or editing driver or vehicle information that can be pushed to HOS from QTRACS, you will see a small EMB notification on your screen that will be either green or red. Green indicates the EMB is turned on and red indicates it is turned off.

Vehicle and Driver Bulk Importer
Services Portal 3.1 provides a vehicle and driver bulk importer tool which allows you to easily add vehicles or drivers to QTRACS and Hours of Service (HOS) and to do a mass or bulk change of one or a few attributes across your entire fleet or a subset of your fleet. The bulk import tool is accessible through QTRACS and allows you to add, update, or rename vehicles through a spreadsheet interface. Note that add and update operations are not supported for MCT equipped vehicles. If you are also licensed for HOS, QTRACS will also attempt to apply information added or updated through the bulk import tool to HOS through the Entity Maintenance Bridge.
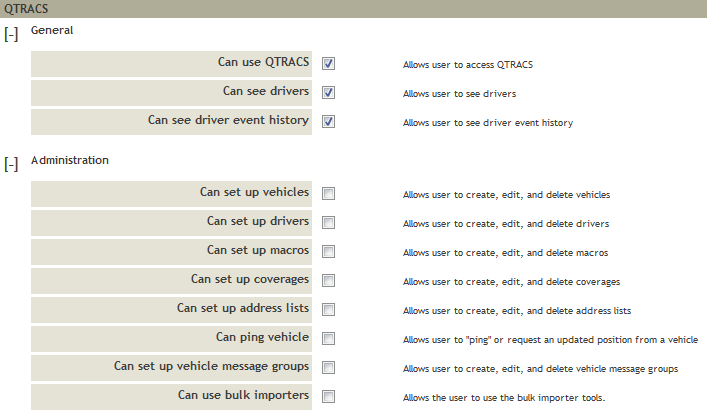
The bulk importer is accessible from the Driver or Vehicle tabs in QTRACS and consists of a four step wizard with complete instructions and sample data provided in the wizard. You download a sample spreadsheet, add your data, then upload the spreadsheet into the wizard. The Bulk Import tab is only visible to users who have the “Can use bulk importers” permission enabled. This permission is disabled by default for all users except those with the Admin role.
The four step wizard is presented as a series of tabs going from top to bottom. The first step is the Overview tab, which provides an overview and description of the process so that users can easily and quickly upload data.
The second step is the sample tab. Which is where you will generate your sample spreadsheet with all of the appropriate attributes corresponding with your driver or vehicle attributes. You can choose to download a basic sample spreadsheet or an advanced sample spreadsheet. The basic sample only contains the most common attributes and the advanced sample contains all attributes. When you toggle between sample and advanced the list of attributes will change so you can see which attributes will be included before generating your sample spreadsheet. You can also choose whether to generate the sample spreadsheet with just a few rows of sample data or your entire fleet’s data. If adding a group of new drivers or vehicles it is recommended to just download a sample with just a few rows of sample data to serve as a guide. If updating existing drivers or vehicles, it is recommended to download the sample with your entire fleet’s data so you can easily find and change the attributes you want to update.
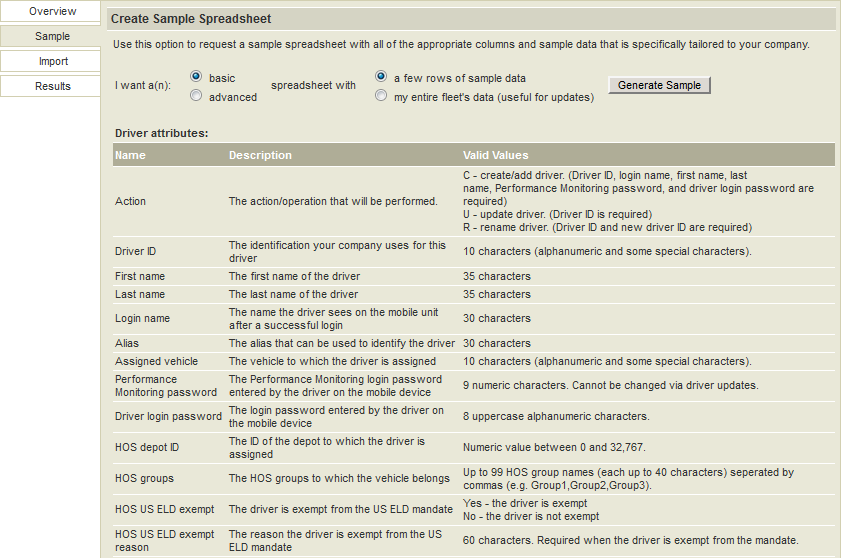
Once you have decided on the options for your sample spreadsheet, click Generate Sample. This submits a report request. Once the spreadsheet is ready, you are notified with an asterisk next to Reports in the banner and can download the spreadsheet from the Reports window.

The third step is the Import tab. Once you have downloaded the sample spreadsheet you will need to fill it in with the data you want to import, whether that is adding new drivers or vehicles, adding new custom attributes, or changing existing attributes. Also ensure you remove the sample fields if you chose the few rows of sample data option when generating the spreadsheet.
Make sure you have saved your spreadsheet to your computer. Click Choose File then navigate to the saved spreadsheet on your computer and click Open. If you have trouble finding your saved spreadsheet, change the file type drop-down list next to the file name from *.csv to All Files since your spreadsheet editor may save the file as a different type than csv such as .xls, ods, or something else. Once you have located and selected the spreadsheet, click Submit. The spreadsheet is uploaded and you are given a confirmation message. If you lose connectivity during the upload, an error message will display and you can attempt to upload again once connectivity is restored.
The import process runs in the background and you are given an alert in your notifier window and on the Alerts page when the import is completed or if there were errors with the import.

The fourth, and final, step is the Results tab. This step lets you review the results of the import attempt. Clicking any of the links related to the import attempt allows you to review the vehicles or drivers that were successfully added, updated, or renamed. This page also allows you to review any errors that occurred. You can then retrieve the uploaded spreadsheet, make modifications, and submit again. All import attempts are saved for the last 60 days. This page provides a single point of access for you to review the results of all import activity for your company regardless of who performed the activity.

CDL Jurisdiction
Services Portal 3.1 now includes adding a jurisdiction along with the CDL number when adding or editing drivers. Jurisdictions are fully supported for the U.S., Canada, and Mexico. Jurisdictions are already supported in HOS so this information will be pushed to HOS through the EMB when added to QTRACS.
If adding a CDL to a driver record through the QTRACS UI, additional drop-down lists have been added directly below the CDL field so you can add a jurisdiction along with the CDL. If you enter anything in the CDL field, the jurisdiction fields are required. If you attempt to edit a record that contained a CDL number but no jurisdiction from prior to Services Portal 3.1, even if attempting to edit a different field than the CDL section, you will not be able to save the changes until you enter a jurisdiction for the CDL or remove the CDL number. Also be aware that if you attempt to change driver attributes across your fleet using the new bulk importer, you will be required to include jurisdiction with any CDL number additions or add jurisdiction for any existing CDL number only entries or the import will fail.

To enter a jurisdiction, simply select the country in the left box then select the state or province from the right box. You must select a country first so that the applicable list of states or provinces can be loaded.
Jurisdictions can also be added through web services by adding the jurisdiction into the existing cdl tag. In order to preserve backwards compatibility, the jurisdiction is not required when adding or editing CDLs through web services.
Web services example: <cdl>[US-PA]54654564</cdl>
VIN Validation
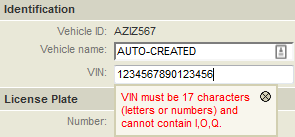
A VIN validation checksum is included in Services Portal 3.1 The option to add a VIN to a vehicle record was added with Services Portal 2.9 and this new validation will ensure that the VIN being entered is correct. The validation will be applied and enforced whether you add or edit the VIN in the QTRACS portal and through web services.
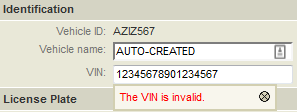
When adding or editing through the QTRACS portal, the VIN will be validated when you click save. If the VIN does not pass validation, the record will stay in edit mode and an error message will display that the VIN is not valid. This error message is different than the one that displays if your VIN does not contain enough characters or contains invalid characters. If you attempt to add or change the VIN through web services and the validation fails “010 VIN is invalid” will be returned.
Disable Driver Force Logoff
The HOS/ELD mandate does not permit anyone other than the driver to initiate a "driver logoff" operation. Therefore, the 'Force Logoff' feature has been removed from QTRACs.
Trailer Tracks Changes
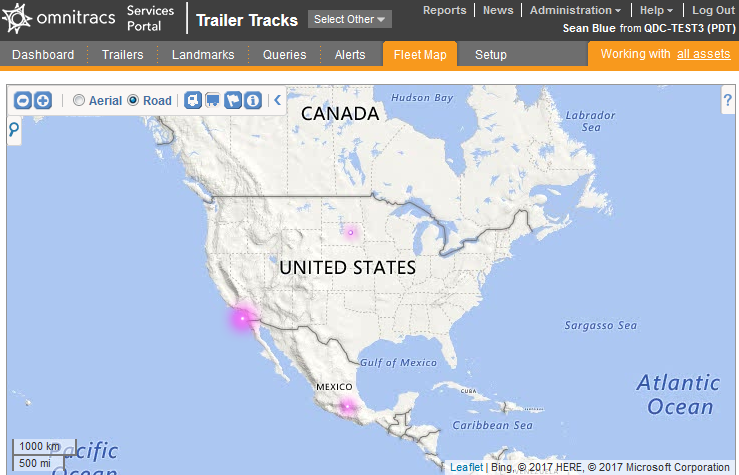
A new tab for Fleet Mapping has been added to the Trailer Tracks portal, allowing you to quickly and easily access the Fleet Mapping application to view all of your trailers, vehicles, and/or landmarks on one map, regardless of the size of your fleet. Clicking on this tab will load the application with the Trailer Tracks portal, allowing you to quickly and easily navigate between the map and other Trailer Tracks tabs when viewing and managing your trailers.
Fixes/Minor Enhancements
QTRACS
- Address lists can no longer be deleted if they are specified as the default vehicle coverage.
- A cleanup utility is applied automatically with the deployment of Services Portal 3.1 to fix any existing issues with vehicles that are assigned to since-deleted coverages or have no coverage assigned. For companies that have a since-deleted vehicle coverage assigned as the default vehicle coverage, the utility automatically assigns the DEADLETTER coverage as the default vehicle coverage. For vehicles that have a since deleted coverage assigned or no coverage assigned, the utility automatically assigns the vehicles to the DEALETTER coverage.
- Fixed the submission screen for the Historical Proximity Report to properly display the geocoded address when specifying a latitude and longitude as a reference point.
- Full length (38-character) free-form macro fields may now be defined consistently/correctly.
- Prefilled macro definitions no longer occasionally remain stuck in the Pending state.
- When creating new TMM messages new line characters are no longer incorrectly removed when using the newer Microsoft browsers.
- OmniExpress has reached end of life and is no longer supported. You can no longer create or copy vehicles equipped with TMCTs.
Trailer Tracks
- Fixed an issue with the TT150 FST so that the TT150 FST Audit Log is available if the trailer has any TT150 FST audit log entries regardless of whether a device is currently installed.
- Fixed an issue with Monitoring Plans so that the same subtab remains displayed as you switch between view and edit modes.
Performance Monitoring
- When editing a vehicle type in the Over RPM Threshold is now accepted and displayed as a 4 digit number instead of a 3 digit number with an implied 0 at the end.
- Fixed the Moving MPG calculation displayed on the Performance Details page which was slightly off for customers using PTO.
- Fixed the Combined Analysis Report so that it no longer hangs when submitted by a limited access user who is a member of both a parent global group and one of its child global groups, and both of those groups are selected.
- Extended the short date formats (mm/dd) on the Possible Sensor Faults report to always include the year (mm/dd/yy). This avoids ambiguity and prevents Excel from making incorrect assumptions when downloading the CSV.
- Fixed some minor spacing issues on the UI when editing memberships on Ad-Hoc Groups and Management Groups.
- When maintaining vehicle types the Send Now confirmation dialogue is displayed only if parameters were actually changed and if vehicles are assigned to that type.
Browser and UI Fixes
- It is now possible to use the back button in IE11 to return to the Trailer Detail query after initially navigating away.
- It is now possible to consistently navigate from the Trailers page to the Performance Monitoring Dashboard after initial login.
- Resolved an IE11 issue so that it is now possible to consistently remove email addresses from the Emergency Tracking feature in Trailer Tracks.
- When creating new TMM messages the message text area is now sized appropriately when using Chrome on Windows 10.
Miscellaneous
- A new role permission was added for HOS to restrict access by depot.
- A warning message was added for CER role permissions. The warning message is: Please select "Can View Critical Event Videos" and "Can Request Custom Critical Event Videos." This warning will display if you grant either permission individually.
- Improved the performance of the Global Group account selector window so that it loads quickly for restricted users with lots of nested groups.
- The online help is now available in French. The French version of the help will be shown if you have any version of French set as your preferred language in your browser.
- The Show # of Rows attribute has been deprecated from the User Preferences page. This attribute controlled the page size on a few legacy Setup pages. As of Services Portal 3.1, the rows-per-page on the legacy pages is fixed at 100.
Previous Releases
- Services Portal 3.5 Release Notes
- Services Portal 3.4 Release Notes
- Services Portal 3.3 Release Notes
- Services Portal 3.2 Release Notes
- Services Portal 3.1 Release Notes
- Services Portal 3.0 Release Notes
- Services Portal 2.9 Release Notes
- Services Portal 2.8 Release Notes
- Services Portal 2.7 Release Notes
- Services Portal 2.6 Release Notes
- Services Portal 2.5 Release Notes